HOW TO.....
Beginners Guide to Creating a Photo Collage
Using Pixlr, a free photo editing software.
I have tons of great photos that I want to show off and display in my house. However, picking between the photos can be hard, which is why a photo collage is so great. I can pick my favorite photos and create a beautiful photo collage.

Photo Collage- Step 1
First, go to www.Pixlr.com/express and click on the collage icon located in the bottom right corner.

Photo Collage- Step 2
You will be presented with a blank canvas (the area where you will put your pictures) and at the bottom of your screen, you will see the options to customize it. You can change the layout, adjust the spacing between the pictures, the roundness, the proportions and the color.
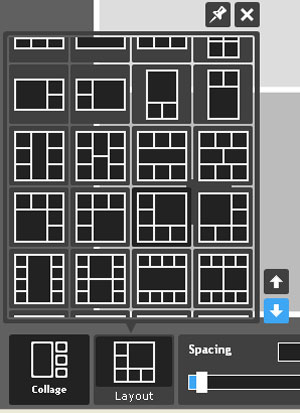
Photo Collage- Step 3
Choosing Your Layout
If you look at the bottom tool panel you will see "Layout", click on the icon and all your layout options will appear. Use the arrows to scroll down to view all the options, the further your scroll down, the more pictures you can add to your collage.


Photo Collage- Step 4
Adding Photos
Once you have picked your layout you will need to add photos. Pixlr makes this part really easy. If you hover your mouse over your canvas a + will appear. Click on the + sign and it will allow you to choose your photo.
If you change your mind and decide that you want to use a different picture, using your cursor, hover over a picture and you will see 3 icons appear. The X will allow you to delete the image from your canvas. If you click on the circular arrow it will allow you to select a different photo.
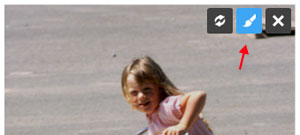

Photo Collage- Step 5
Editing Your Photo
Now that I have selected all my photos I will want to edit some so that my collage is perfect.
When you hover over the picture, the top right corner will see 3 icons appear. Click on the middle icon which is a paintbrush. This will open your photo up and give you an editing toolbar.
The different editing options are Adjustments, Effects, Overlay, Border, Stickers & Text.
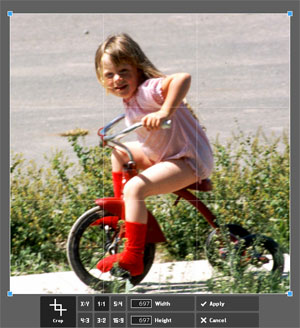
Photo Collage- Step 6
Adjustments
The Adjustments tab will allow you to color correct your photo, make basic adjustments such as crop, and some really cool stuff like air brushing.
The tools are pretty userfriendly, you just need to click on it & play around until you get a good feel for it. If you like what you have created hit "Apply," if you don't, hit "Cancel."
For my photo, I cropped out the road that was above my subject's head because it took up too space in my collage. I also used the color adjustment to adjust the hue & saturation of my photo.
Hue corrects the color tone of the picture. For example, if a photo is too warm or "red" you can cool it down and slide the bar which will add in some blue's and green's. The saturation just takes the color & amplifies the color so that it is more vibrant.
Tip: When adjusting your saturation, be careful with the reds in your photo, as you can see in my photo, the socks and the tricycle are almost glowing. You can easily oversaturate your reds, so use with caution!
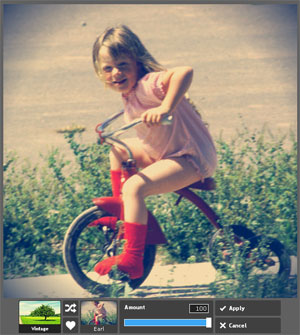

Photo Collage- Step 7
Effects


Photo Collage- Step 8
Editing Your Photo
Now that I have selected all my photos I will want to edit some so that my collage is perfect.
When you hover over the picture, the top right corner will see 3 icons appear. Click on the middle icon which is a paintbrush. This will open your photo up and give you an editing toolbar.
The different editing options are Adjustments, Effects, Overlay, Border, Stickers & Text.


Photo Collage- Step 9
Editing Your Photo
Now that I have selected all my photos I will want to edit some so that my collage is perfect.
When you hover over the picture, the top right corner will see 3 icons appear. Click on the middle icon which is a paintbrush. This will open your photo up and give you an editing toolbar.
The different editing options are Adjustments, Effects, Overlay, Border, Stickers & Text.


Photo Collage- Step 10
Editing Your Photo
Now that I have selected all my photos I will want to edit some so that my collage is perfect.
When you hover over the picture, the top right corner will see 3 icons appear. Click on the middle icon which is a paintbrush. This will open your photo up and give you an editing toolbar.
The different editing options are Adjustments, Effects, Overlay, Border, Stickers & Text.


Photo Collage- Step 11
Editing Your Photo
Now that I have selected all my photos I will want to edit some so that my collage is perfect.
When you hover over the picture, the top right corner will see 3 icons appear. Click on the middle icon which is a paintbrush. This will open your photo up and give you an editing toolbar.
The different editing options are Adjustments, Effects, Overlay, Border, Stickers & Text.
Check Out Our Great Tutorials on Digital Images, Videos & More
Editing & Color Correction |
|
Fun & Quirky Tutorials |
|
Emailing, Cropping, Unzipping & Downloading Files |
|
Do It Your Self Guides |
|
| |
Protecting & Storing Digital Files |
|
| |
Digital Cameras |
|
| |


